VNC
VNC is a tool which projects a desktop session over the network. If may be useful if you want to use GUI tools remotely when X forwarding performs poorly. The popular use of VNC is to access a computer from work or by using another computer. By connecting a VNC viewer to a VNC server, a remote desktop is accessed on your local machine. Multiple VNC viewer clients can connect to a VNC server. In this case, users can use VNC to connect to a VNC server in SCOREC from another computer outside the network.
Definitions and Introductions
More information on VNC technologies can be found here.http://en.wikipedia.org/wiki/Virtual_Network_Computing VNC
local machine: the machine you are physically located at
remote machine: the machine you wish to interact with graphically, in this case the landing pad, lp02
Start up the VNC Server
The following steps will start the VNC server. After the VNC has been started it will run in the background until the landing pad is restarted or you decide to manually stop the server.
- Login to the landing pad:
ssh@lp02.ccni.rpi.edu
- Start the VNC server and enter the desired vnc desktop resolution:
vncserver -geometry 1680x1050
- Enter a vnc password. Note, this should not be the same as your CCI
password. If you would like to change the vnc password run the
vncpasswdcommand. - The output from the vncserver command will tell you the REMOTE
PORT NUMBER of the session; below it is the 3 following
alp02:. This is needed when you connect using a VNC client.$ vncserver New 'alp02:3 (`<USERNAME>`)' desktop is **alp02:3** Starting applications specified in /gpfs/u/home/`<PROJECTNAME>`/`<USERNAME>`/.vnc/xstartup Log file is /gpfs/u/home/`<PROJECTNAME>`/`<USERNAME>`/.vnc/alp02:3.log
[Re-]Connect to the VNC Server using a VNC client
A VNC client such as TightVNC or RealVNC Viewer is required on the local machine.
Connect from off campus
If you are connecting from off campus you will first have to establish a connection through the RPI firewall. Users with an RPI RCS ID then can connect through the RPI VPN.
Connect from a UNIX/Linux system
TightVNC
vncviewer -via@lp02.ccni.rpi.edu :<REMOTE`` ``PORT`` ``NUMBER>
RealVNC on OSX
First setup ssh port forwarding:
ssh -t -t -L5903:localhost:5903@lp02.ccni.rpi.edu
Then, launch the RealVNC Viewer, enter :03 into the 'VNC Server'
field, and click 'connect'.
Connect from a Windows System
Adapted from the SCOREC VNC Wiki page.
Note, this example uses lp05 as the VNC server.
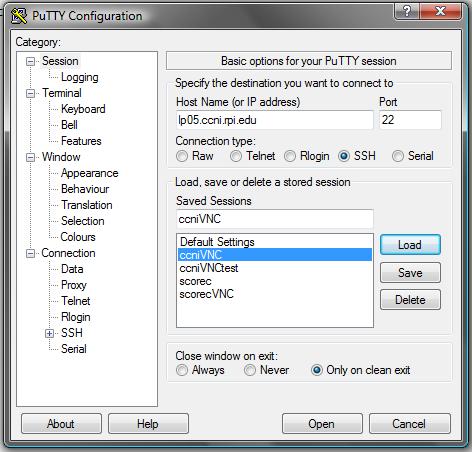
The PuTTY SSH client can handle ssh tunneling on Windows based machines. You can download it here: http://www.chiark.greenend.org.uk/~sgtatham/putty/
When you open putty, enter lp05.ccni.rpi.edu as in the Host Name
box. 
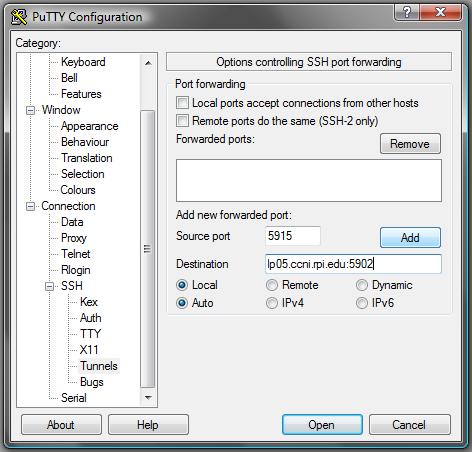
Then click the + button next to SSH on the left pane (to expand the SSH
tree node). Choose the Tunnels page. Enter the number for an open port,
the LOCAL PORT NUMBER, in the "Source port" box, in this case 5915
was entered. Enter lp05.ccni.rpi.edu:59lp05.ccni.rpi.edu:5902 was entered.

Then click "Open" and login as normal.
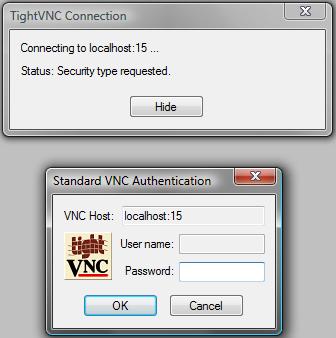
Launch vncviewer and enter into the server field
localhost:59<LOCAL`` ``PORT`` ``NUMBER>; for this example the
LOCAL PORT NUMBER is 15, so localhost:5915 is entered.
Next login to the vncserver by entering the password previously set with
vncpassword.

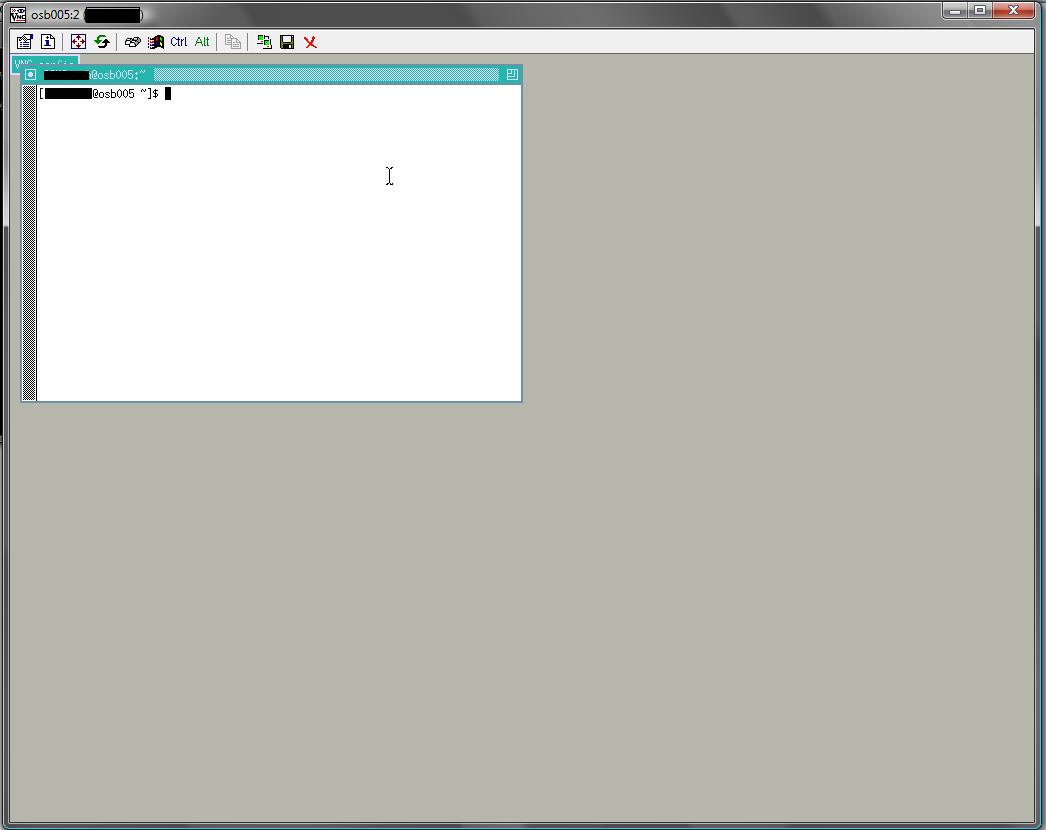
If this was successful a new window should open with your remote desktop
as depicted in Figure 4. 
Usage Tips and Suggestions
Most users find it more convenient to keep the vncserver running between uses instead of stopping and starting the server every time you want to use the VNC.
When done working via the VNC close the VNC Viewer window. Do not 'logout' of the desktop session inside the VNC; via the graphical menus or other means.